GSI

맨날 도구상자에 있는 컨트롤만 쓰고 있는 나로서는..
새로운 UI를 구상할때면.. 좀 난감해 지네요 ^^..

이번에는 ListBox를 확장해야할듯 해서

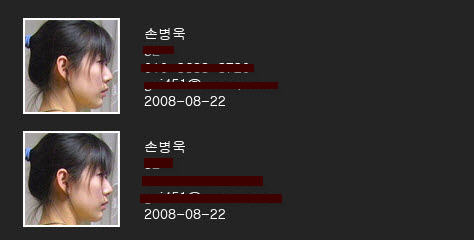
바로 위와 같이 하나의 아이템에 복합적인 데이터가 들어가있다고 가정을 하고 작업을 해야 됩니다.
이미지 정보와 해당 이름 또는 나이 저노하 번호 등등..
이걸 위해서는 DrawItem()을 따로 구현해 줘야 되네요.

사용자 삽입 이미지

우선 데이터를 집어 넣을때는
listBox1.Items.Add(new TestTemplate("손병욱", "d:\\a.bmp"));
이와 같이 하나의 데이터 템플릿 클래스를 제작하고 그기에 맞도록 해당 데이터를 추가 해야 됩니다.

그리고 DrawItem()을 가능하게 하기 위한 ListBox의 설정또한 잊지 말아야 하구요.. ^^

간단하게 DrawItem의 드로잉 하는 부분을 아래와 같이 처리 하면 되는군요.

   private void listBox1_DrawItem(object sender, System.Windows.Forms.DrawItemEventArgs e)
  {
   if(listBox1.Items.Count <= 0)
    return;

   // Set the DrawMode property to draw fixed sized items.
   listBox1.DrawMode = DrawMode.OwnerDrawVariable;
   // Draw the background of the ListBox control for each item.
   e.DrawBackground();

   // Create a new Brush and initialize to a Black colored brush by default.
   Brush myBrush = Brushes.Black;

   // Determine the color of the brush to draw each item based on the index of the item to draw.
   switch (e.Index)
   {
    case 0:
     myBrush = Brushes.Red;
     break;
    case 1:
     myBrush = Brushes.Orange;
     break;
    case 2:
     myBrush = Brushes.Purple;
     break;
   }

    // 이 부분에서 해당 값을 가져 올때 TestTemplate의 값으로 형변환 한 후에 값을 접근가능..
   TestTemplate tt = (TestTemplate)listBox1.Items[e.Index];

   // Draw the current item text based on the current Font and the custom brush settings.
   e.Graphics.DrawImage(new Bitmap(tt.path), e.Bounds);
   e.Graphics.DrawString(tt.name, e.Font, myBrush,e.Bounds,StringFormat.GenericDefault);
   // If the ListBox has focus, draw a focus rectangle around the selected item.
   e.DrawFocusRectangle();
  }

이때 이미지와 여러가지를 표현하기 위해서는 아래의 함수도 오버라이딩 해서 변경해줘야 하네요.

  private void listBox1_MeasureItem(object sender, System.Windows.Forms.MeasureItemEventArgs e)
  {
   e.ItemHeight = 100;
  }

위의 내용을 토대로 샘플을 하나 만들어 볼까 합니다.

하지만 고려되어야 하는 사항은 이미지가 들어가기 때문에
많은 양의 데이터를 읽어 들일때 UI가 블락킹 되는 현상이 불현듯 보이네요..
백그라운드 쓰레드나 일반 쓰레드를 통해서 따로 돌려야 할듯 합니다.
그러면 조금더 나은 UI 및 컨트롤을 구현할 수 있을거 같습니다.

개봉박두~~~..
 

Posted by gsi
:

[C#] Round Rectangle 처리하기

C# 2008. 8. 21. 17:04 |

사용자 삽입 이미지

RoundPanel 클래스를 제작했습니다.
Panel을 상속해서 처리 했습니다.

Round 하는 코드는 아래의 코드를 참조 하시면 됩니다.       

        static public GraphicsPath GetRoundedRectPath(Rectangle rect, int radius)
        {
            int diameter = 2 * radius;
            Rectangle arcRect =
                new Rectangle(rect.Location, new Size(diameter, diameter));

            GraphicsPath path = new GraphicsPath();

            path.AddArc(arcRect, 180, 90);

            arcRect.X = rect.Right - diameter;
            path.AddArc(arcRect, 270, 90);

            arcRect.Y = rect.Bottom - diameter;
            path.AddArc(arcRect, 0, 90);

            arcRect.X = rect.Left;
            path.AddArc(arcRect, 90, 90);

            path.CloseFigure();

            return path;
        }

Panel 함수에서 드로잉 하는 코드 입니다.
       

        private void roundPanel_title_Paint(object sender, PaintEventArgs e)
        {
            RoundPanel panel = (RoundPanel)sender;

            Graphics g = e.Graphics;
            g.SmoothingMode = SmoothingMode.HighQuality;

            int width = panel.ClientRectangle.Width;
            int height = panel.ClientRectangle.Height;

            Rectangle rect = new Rectangle(0, 0, width-1, height-1);
            using (GraphicsPath path = RoundPanel.GetRoundedRectPath(rect, 8))
            {
                using (Brush brush = new LinearGradientBrush(
                                            new Rectangle(0, 0, panel.ClientRectangle.Width, panel.ClientRectangle.Height),
                                            Color.FromArgb(panel.Opcity, 102, 102, 102),
                                            Color.FromArgb(panel.Opcity, 0, 0, 0),
                                            90.0f))
                {
                    //graphics.FillRectangle(brush, 0, 0, this.ClientRectangle.Width, this.ClientRectangle.Height);
                    g.FillPath(brush, path);
                }

                //g.FillPath(Brushes.Yellow, path);
                Pen pen = new Pen(Color.FromArgb(panel.Opcity, 255, 255, 255));
                g.DrawPath(pen, path);
            }
        }

이걸 처리 하다 보면 화면을 전환 하거나 리프레쉬할때 플리커 현상이 생기기도 합니다.
이걸 해결하기 위해서 RoundPanel에 더블버퍼링 처리 코드를 추가 했습니다.

        public RoundPanel()
        {
            ...
            this.SetStyle(  ControlStyles.UserPaint |
                            ControlStyles.AllPaintingInWmPaint |
                            ControlStyles.DoubleBuffer, true);
        }

실행 파일 :


.
관련 코드 :


.
 

Posted by gsi
:

특정 폴더를 기준으로 하위 폴더를 찾아 내는 코드 입니다.
그리고 그 폴더 내용을 xml 형태로 만들어 주는 코드도 포함되어 있습니다.
xml 데이터로 만들어진 내용은 CEdit 컨트롤에 표시되며, 그 내용을
저장할 수 있습니다.


관련 소스 :


.

Posted by gsi
:

MFC에서 xml 데이터를 읽어 들이는 예제입니다.
아래의 내용을 계층구조를 통해서 읽어 들이게 됩니다.
자세한 소스는 소스 코드를 참조 하세요.
  - XmlParser.h, cpp

[xml 샘플]

<?xml version="1.0" encoding="EUC-KR"?>

<PATHS>
 <PATH NAME="Install Files">
  <PATH NAME="Dev">
  </PATH>
  <PATH NAME="Dev2">
  </PATH>
  <PATH NAME="Dev3">
   <PATH NAME="Dev3_a">
   </PATH>
   <PATH NAME="Dev3_b">
    <PATH NAME="Dev3_b_a">
    </PATH>
    <PATH NAME="Dev3_b_b"/>
   </PATH>
  </PATH>
 </PATH>
 <PATH NAME="temp">
  <PATH NAME="temp_a"/>
  <PATH NAME="temp_b">
   <PATH NAME="temp_b_a">
   </PATH>
   <PATH NAME="temp_b_b">
    <PATH NAME="temp_b_c"/>
   </PATH>
  </PATH>
 </PATH>
</PATHS>

계층 구조를 읽어 들이는 코드 (재귀호출)

1. 초기화 및 도입부

 ///
 MSXML2::IXMLDOMNodePtr nodeList = m_pDoc->selectSingleNode( Token.c_str() );
 _bstr_t bsElements("PATHS");

 if ( nodeList )
  FindName( nodeList->GetchildNodes() );

 nodeList.Release();

2. 재귀호출 부분

int tabCount = 0;

HRESULT CXmlParser::FindName( MSXML2::IXMLDOMNodeListPtr& lparam )
{
 long elementCount = lparam->Getlength();
 for( int i = 0; i < elementCount; i++ )
 {
  MSXML2::IXMLDOMElementPtr Element = lparam->nextNode();
  if( Element == NULL )
   break;

  _bstr_t bsNodename = Element->GetnodeName();
  _bstr_t bsElement("PATH");
  if( bsNodename == bsElement )
  {
   _bstr_t bsname("NAME");
   _variant_t varElementName = Element->getAttribute(bsname);

   // 해당하는 엘러먼트 Name의 이름 == 폴더 이름을 의미한다.
   CString strName;
   strName.Format( "%S", varElementName.bstrVal );    

   // 탭 카운터를 통한 출력
   CString strTabMergy;
   for( int tc = 0; tc < tabCount; tc++ )
   {
    strTabMergy += "\t";
   }
   strTabMergy += strName;
   TRACE( "%s\n", (LPSTR)(LPCSTR)strTabMergy);

   MSXML2::IXMLDOMNodeListPtr childElementlist = Element->GetchildNodes();
   if( childElementlist )
   {
    tabCount++;
    FindName( childElementlist );
   }
  }

  Element.Release();
 }

 tabCount--;
 lparam.Release();

 return S_OK;
}

아래의 콘솔 화면 내용입니다.

사용자 삽입 이미지


소스 코드 :


.

Posted by gsi
:

Panel에 두장의 이미지(Bitmap)를 추가한 후에
위의 이미지에 알파값을 추가해서 블랜딩 효과를 줘봤습니다.

사용자 삽입 이미지


코드는 아래와 같아요..


        private void panel_before_Paint(object sender, PaintEventArgs e)
        {
            Graphics g = e.Graphics;

            g.DrawImage(beforeLeftImage, new PointF(0, 0));

            float[][] ptsArray =
            {
                new float[] { 1, 0, 0, 0, 0},
                new float[] { 0, 1, 0, 0, 0},
                new float[] { 0, 0, 1, 0, 0},
                new float[] { 0, 0, 0, 0.7f, 0},
                new float[] { 0, 0, 0, 0, 1}
            };

            ColorMatrix clrMatrix = new ColorMatrix(ptsArray);
            ImageAttributes imageAtrr = new ImageAttributes();
            imageAtrr.SetColorMatrix(clrMatrix,
                ColorMatrixFlag.Default,
                ColorAdjustType.Bitmap);

            g.DrawImage(beforeXrayLeftIamge,
                new Rectangle(50, 50, beforeXrayLeftIamge.Width, beforeXrayLeftIamge.Height),
                0, 0, beforeXrayLeftIamge.Width, beforeXrayLeftIamge.Height,
                GraphicsUnit.Pixel,
                imageAtrr);

        }

Posted by gsi
: