GSI

PathInfo.cs
----------------------------
using System;
using System.Collections.Generic;
//using System.Linq;
using System.Text;
using System.Collections.ObjectModel;

namespace GsiImageView
{
    public class PathInfo
    {
        private string _path;
        private string _filename;

        public string Path
        {
            get { return _path; }
            set { _path = value; }
        }

        public string FileName
        {
            get { return _filename; }
            set { _filename = value; }
        }

        public PathInfo(string path, string filename)
        {
            this._path = path;
            this._filename = filename;
        }
    }

    public class PathInfoList : ObservableCollection<PathInfo>
    {
        public PathInfoList()
        {
            //최초 입력
            Add(new PathInfo(@"D:\WPF_Project\GsiImageView\Image\1111.jpg", "1111.jpg"));
            Add(new PathInfo(@"D:\WPF_Project\GsiImageView\Image\2222.jpg", "2222.jpg"));
        }
    }
}

Window1.xaml
-------------------------------
<Window
 xmlns="http://schemas.microsoft.com/winfx/2006/xaml/presentation"
 xmlns:x="http://schemas.microsoft.com/winfx/2006/xaml"
    xmlns:c="clr-namespace:GsiImageView"
 xmlns:d="http://schemas.microsoft.com/expression/blend/2006" xmlns:mc="http://schemas.openxmlformats.org/markup-compatibility/2006" mc:Ignorable="d" xmlns:GsiImageView="clr-namespace:GsiImageView"
 x:Class="GsiImageView.Window1"
 x:Name="Window"
 Title="Gsi ImageViewer"
 Width="640" Height="480">

 <Window.Resources>
        <c:PathInfoList x:Key="pathData" />
        <ObjectDataProvider x:Key="PathInfoListDS" d:IsDataSource="True" ObjectType="{x:Type GsiImageView:PathInfoList}"/>
  <DataTemplate x:Key="PathInfoListTemplate">
   <DataTemplate.Resources>
    <Storyboard x:Key="OnLoaded1">
     <DoubleAnimationUsingKeyFrames BeginTime="00:00:00" Storyboard.TargetName="stackPanel" Storyboard.TargetProperty="(UIElement.Opacity)">
      <SplineDoubleKeyFrame KeyTime="00:00:00" Value="0.1"/>
      <SplineDoubleKeyFrame KeyTime="00:00:00.3000000" Value="1"/>
     </DoubleAnimationUsingKeyFrames>
    </Storyboard>
   </DataTemplate.Resources>
   <StackPanel HorizontalAlignment="Stretch" Margin="0,2,2,2" x:Name="stackPanel" VerticalAlignment="Stretch" RenderTransformOrigin="0.5,0.5">
    <StackPanel.Background>
     <LinearGradientBrush EndPoint="1,0.5" StartPoint="0,0.5">
      <GradientStop Color="#FFA1A1A1" Offset="0"/>
      <GradientStop Color="#FFFFFFFF" Offset="1"/>
     </LinearGradientBrush>
    </StackPanel.Background>
    <StackPanel.RenderTransform>
     <TransformGroup>
      <ScaleTransform ScaleX="1" ScaleY="1"/>
      <SkewTransform AngleX="0" AngleY="0"/>
      <RotateTransform Angle="0"/>
      <TranslateTransform X="0" Y="0"/>
     </TransformGroup>
    </StackPanel.RenderTransform>
    <TextBlock HorizontalAlignment="Stretch" Margin="0,2,0,2" VerticalAlignment="Stretch" Padding="4,0,0,0" Text="{Binding Path=FileName}"/>
    <Border Height="Auto" BorderBrush="#FFCFD6FF" BorderThickness="2,2,2,2" Width="{Binding ElementName=Slider_ImageSize, Path=Value}">
     <Image Width="Auto" Height="Auto" Source="{Binding Path=Path}"/>
    </Border>
   </StackPanel>
   <DataTemplate.Triggers>
    <EventTrigger RoutedEvent="FrameworkElement.Loaded" SourceName="stackPanel">
     <BeginStoryboard Storyboard="{StaticResource OnLoaded1}"/>
    </EventTrigger>
   </DataTemplate.Triggers>
  </DataTemplate>
  <ItemsPanelTemplate x:Key="ItemsPanelTemplate1">
   <WrapPanel/>
  </ItemsPanelTemplate>
 </Window.Resources>

 <Window.Background>
  <LinearGradientBrush EndPoint="0.988,0.988" StartPoint="0.008,0.054">
   <GradientStop Color="#FFB5B5B5" Offset="0"/>
   <GradientStop Color="#FFFFFFFF" Offset="1"/>
  </LinearGradientBrush>
 </Window.Background>

 <Grid x:Name="LayoutRoot">
  <Grid.RowDefinitions>
   <RowDefinition Height="30.192"/>
   <RowDefinition Height="*"/>
  </Grid.RowDefinitions>
  <Label HorizontalContentAlignment="Center" Padding="0,0,0,0" VerticalContentAlignment="Center" HorizontalAlignment="Left" Margin="0,0,0,0" Width="43" Content="경로 :"/>
  <TextBox Background="{x:Null}" BorderBrush="#7F939393" BorderThickness="2,2,2,2" HorizontalContentAlignment="Left" Padding="0,1,0,1" VerticalContentAlignment="Center" Margin="43,0,0,0" x:Name="DirBox" Text="TextBox" TextWrapping="Wrap" HorizontalAlignment="Left" Width="59"/>
  <Button HorizontalAlignment="Right" Margin="0,0,0,0" x:Name="FolderOpen" Width="63" Content="테스트" Click="OnFolderOpenClick"/>
  <ListBox IsSynchronizedWithCurrentItem="True" Background="{x:Null}" Margin="4,4,4,4" x:Name="ImgListBox" Grid.Row="1" ScrollViewer.HorizontalScrollBarVisibility="Disabled" ItemTemplate="{DynamicResource PathInfoListTemplate}" ItemsPanel="{DynamicResource ItemsPanelTemplate1}" ItemsSource="{Binding Mode=OneWay, Source={StaticResource pathData}}"/>
  <Slider Margin="109,0,70,0" x:Name="Slider_ImageSize" VerticalAlignment="Center" Maximum="1024" Minimum="10" Value="100"/>
 </Grid>
</Window>

Window1.xaml.cs
-----------------------------
using System;
using System.IO;
using System.Net;
using System.Windows;
using System.Windows.Controls;
using System.Windows.Data;
using System.Windows.Media;
using System.Windows.Media.Animation;
using System.Windows.Navigation;
using System.Threading;

namespace GsiImageView
{
 public partial class Window1
 {
        public delegate void UpdateImage(string _path);

  public Window1()
  {
   this.InitializeComponent();
   
   // Insert code required on object creation below this point.

            //ObjectDataProvider dp = (ObjectDataProvider)this.FindResource("PathInfoListDS");
            //pathInfolist = (PathInfoList)dp.Data;
  }

        private void OnFolderOpenClick(object sender, RoutedEventArgs e)
        {
            //ImgListBox.Items.Add(new PathInfo(@"D:\WPF_Project\GsiImageView\Image\3333.jpg", "3333.jpg"));

            //Window1 w1 = new Window1();
            Thread loadThread = new Thread(new ThreadStart(DataLoad));
            loadThread.Start();
            Thread.Sleep(1);
        }

        private void DataLoad()
        {
            //디렉토리 경로 가져 오기
            DirectoryInfo di = new DirectoryInfo(@"D:\WPF_Project\GsiImageView\Image\MaxImageTest");
            try
            {
                if (di.Exists)
                {
                    //경로가 있음
                    foreach (FileInfo fi in di.GetFiles())
                    {
                        //경로를 타고 세부 이미지 이름을 얻어 온다.
                        string path = di.FullName + "\\" + fi.Name;
                        //il.Add(new PathInfo(path, fi.Name));

                        this.Dispatcher.Invoke(System.Windows.Threading.DispatcherPriority.DataBind, new UpdateImage(UpdateImageList), path);

                        Thread.Sleep(60);
                    }
                }
                else
                {
                    MessageBox.Show("경로가 확실하지 않습니다.");
                    return;
                }
            }
            catch
            {
                MessageBox.Show("경로가 확실하지 않거나, 비정상 오류 입니다.");
                return;
            }
        }

        public void UpdateImageList(string _path)
        {
            PathInfoList pathinfolist = (PathInfoList)this.FindResource("pathData");
            pathinfolist.Add(new PathInfo(_path, "none.jpg"));
//            Thread.Sleep(1);
/*
            //pathInfolist.Add(new PathInfo(_path, "none"));
            ImgListBox.Items.Add(new PathInfo(_path, "none"));
            ImgListBox.UpdateLayout();
            try
            {
                int iii = 0;
            }
            catch(Exception e)
            {
                int iii = 0;
            }
 */
        }
 }
}

Posted by gsi
:

타이머 사용하기

WPF 2007. 9. 10. 23:15 |

본 글은 http://www.hoons.kr 에 있는 내용을 나름대로 이해되는 부분에 한해서 적은 것입니다.

타이머 사용을 위해서 네임 스페이스를 하나 선언합니다.
using System.Windows.Threading;

타이머 변수를 하나 선언합니다.
DispatcherTimer dt = new DispatcherTimer();

그리고 난수를 하나 생성하게 됩니다.
Random ran = new Random();

이후에 코드에 맞는 해당 값들의 전역 변수들을 선언 하면 됩니다.

dt의 타이머를 사용하기 위해서 초기 설정을 하게 됩니다.
dt.Interval = TimeSpan.FromMilliseconds(30);
dt.Tick += new EventHandler(dt_Tick);
dt.Start();


Tick에 추가한 이벤트 핸들러에 대한 함수 원형을 추가 합니다.
void dt_Tick(object sender, EventArgs e)
{
   .....
}


..... 이상 코드는 여기까지.......

Start()를 하고 나면 계속해서 타이머가 동작 하게 됩니다.
타이머 동작을 멈추고 싶다면 dt.Stop()를 해주면 됩니다.


이후에 참고할 만한 코드는

* 랜덤 함수는 ran.NextDouble() 를 사용해서 double형 값을 가져 올수 있습니다.
   물론 double 말고도 int형을 가져 오는 함수도 존재 합니다.
* Canvas에 있는 오브젝트의 위치를 변경하기 위해서 아래와 같은 코드가 가능해 집니다.
   Canvas.SetLeft(im, currX);
   Canvas.SetTop(im, currY);
   - im은 Canvas에 있는 객체의 Name 이며, currX, currY 는 전역 변수로 가지고 있는
     위치가 되겠습니다.
* 해당 값의 절대값을 사용하기 위해서 아래의 코드를 사용합니다.
    if (Math.Abs(currX - destX) < 1)
    {
        destX = ran.NextDouble() * this.ActualWidth;
        destY = ran.NextDouble() * this.ActualHeight;
    }


Posted by gsi
:

버튼 위치 이동시키기.

WPF 2007. 9. 9. 05:39 |

Button을 이동시키기 위해서는 Margin의 값을 잘 살펴 보면 된다.
이 값이 어떤 Property이고 어떻게 이동해 주어야 하는지 찾아야 한다.

참고로 Button의 Name가 MoveObject 라고 가정하고 시작한다.

Blend에서 Button을 하나 생성한 후에 마우스로 이동해 보자.
그러면 Margin의 값이 바뀌는 것을 알수 있다. 즉 Left, Top의 값이 바뀌게 되는 것이다.
그렇다면 비아인드 코드를 작성 할려면 Margin에 특정 값을 넣어 주면 되는 것이다.

MoveObject.Margin.Left 라는 속성이 있지만 이것은 특정 int, double의 값을 추가할수는 없다.

그래서 cs 파일의 MoveObject.Margin의 툴팁 정보를 보니
FrameworkElement.margin property 라고 나오는 것을 볼 수 있었다.
그래서 msdn에서 FrameworkElement.margin을 찾아 보았다.

아하! Syntax 에 보니
C#
public Thickness Margin { get; set; }
이런 구문을 볼 수 있었다. 바로 Thickness를 하나 생성한 후에 값을 추가 하고
Margin에 대입해 주면 되는거라고 짐작이 될것이다.

그래서 아래와 같은 코드를 사용해서 하면 된다.

Thickness th = new Thickness(marginleft, margintop, 0, 0);
MoveObject.Margin = th;
이상.  (msdn을 잘 활용하자. 거의 모든 코드가 다 있다. ^^)
Posted by gsi
:

랜덤 코드 사용하기

WPF 2007. 9. 9. 05:34 |

네임스페이스 선언 : using System.Threading;

코드 사용방법 :

Random autoRand = new Random();
double marginleft = autoRand.NextDouble() * (this.Width - MoveObject.Width);
double margintop = autoRand.NextDouble() * (this.Height - MoveObject.Height);

Thickness th = new Thickness(marginleft, margintop, 0, 0);
MoveObject.Margin = th;

Next()는 int형 정보를 가져올때 사용한다.
NextDouble()는 double형 정보를 가져 올때 사용한다.

이후에도 seed의 값을 입력 하는 방법도 있으니 참고 하기 바란다.

Posted by gsi
:

UIElement3D extensibility - 3D Video Carousel

Recently I've been working on a screencast, which goes over some advanced aspects of working with Element3D. In the meantime, this sample demonstrates WPF's Orcas Beta 2 UIElement 3D technology, covering the essentials for how you can make your own reusable UIElement3D controls for 3D. I have two in here:

  1. A "KeepCaseUIElement3D", a representation of a real world DVD case, with the added twist of playing video on the inside. It's API consumes Uri's for cover images and a media source, rather than traditional models, meshes, and materials in 3D .
  2. A "MovieCarousel" - a simple 3D carousel layout control which re-orients itself to position the object which was last clicked towards the user.

You will need to operate with the WPF V3.5(Orcas) Beta 2 Bits. You can get the Visual Studio Orcas Beta 2 installation with WPF from here.

A set of streaming WPF tutorial Videos

Concepts you can see in practice with this sample include:

  • Creating interactive 3D controls as interactive containers on non-interactive 3D models (Hint - Leverage existing 3D Xaml with little effort)
  • Creating a Custom Visual3D container type
  • Use of StaticResources from Application.Resources to separate mesh details from overall structure
  • Databinding a mesh texture to consume a local DP exposed as a URI, via a data binding type converter
  • 3D Layout - Cylinder Layout Helper class
  • Playing Video as a material on 3D

If you have any questions on the details of this sample, feel free to send me a message, or leave a relevant comment- odds are fair other folks have similar questions, which could make for interesting future blog postings!

 Thanks!

관련자료 : http://blogs.msdn.com/pantal/archive/2007/08/22/uielement3d-extensibility-dvd-keep-case-player-cylindrical-carousel-layout.aspx

Posted by gsi
:

What’s new in WPF 3.5

WPF 2007. 9. 7. 09:29 |

What’s new in WPF 3.5

With the release of WPF 3.5 beta 2 (download here: http://www.microsoft.com/downloads/details.aspx?FamilyId=D2F74873-C796-4E60-91C8-F0EF809B09EE&displaylang=en), we’ve added some exciting new features to WPF 3D.  At a very high level these can be grouped in to two main additions: UIElement3D and Viewport2DVisual3D.  Over the next couple of weeks we’ll be adding examples and tips and tricks to the blog on these new additions, but for now we’ll start with a quick overview of what both of these provide.

UIElement3D

In the 2D world, UIElement adds layout, input, focus and eventing on to Visual.  UIElement3D brings these same things (except no layout) to 3D.  What this means is that the standard events and means of adding event handlers that you’re used to with UIElements now applies in the 3D world with UIElement3D. 

UIElement3D itself is an abstract class that derives from Visual3D.  To make it useable out of the box without having to derive from UIElement3D yourself, we’ve provided two new classes:  ModelUIElement3D and ContainerUIElement3D. 

ContainerUIElement3D does exactly what its name says.  It is a container for other Visual3Ds.  It has one main property, Children, which is used to add and remove 3D children.  The ContainerUIElement3D doesn’t have a visual representation itself, but rather is just a collection of other 3D objects.

ModelUIElement3D has one property, Model, which is the Model3D that should be displayed to represent the UIElement3D.  It has no children itself, and in some ways you can think of ModelUIElement3D like a Shape in the 2D world.

If you’re familiar with ModelVisual3D, then ContainerUIElement3D and ModelUIElement3D should look very familiar.  The difference is we’ve gone and split the functionality of ModelVisual3D (i.e. a model and children) in to two separate classes, one with a model and the other with children.

With these then, making use of layout, focus and eventing is very easy.  For instance, say you want to create a 3D object that responds to mouse events, you can just do:

                <ModelUIElement3D  MouseDown="OnMouseDown"/>

And then in the code behind have:

      protected void OnMouseDown(object sender, MouseButtonEventArgs e)

      {

          Console.WriteLine("Hello");

      }

If you have experience adding event handlers in the 2D world, then this should look immediately familiar.  In fact it’s exactly the same, and UIElement3D is going to handle the same routed events that a UIElement deals with.  With the addition of UIElement3D you now get all the great functionality that UIElement provided to 2D, but now in the 3D world!

Viewport2DVisual3D

The second main addition is Viewport2DVisual3D which enables you to put interactive 2D on 3D in WPF.  If you’ve used the 3DTools work that was released shortly after the 3.0 release of WPF, Viewport2DVisual3D will look very familiar to you.  With 3.5 though we’ve fully integrated 2D on 3D in to WPF rather than requiring a separate DLL to have this feature.  The 2D and 3D trees are also integrated now, so if you walk up to a 2D visual on 3D and ask it for its parent, it will tell you the 3D object it is on.

Viewport2DVisual3D derives from Visual3D and has three main dependency properties: Visual, Geometry and Material.

Visual – This is the 2D Visual that will be placed on the 3D object.

Geometry – The 3D geometry for the Viewport2DVisual3D

Material – This describes the look of the 3D object.  You can use any material you want.  For the material that you want to have the Visual be placed on, you simply need to set the Viewport2DVisual3D.IsVisualHostMaterial attached property to true.

Below is a XAML example using Viewport2DVisual3D

<Viewport2DVisual3D Geometry="{StaticResource plane}">

        <Viewport2DVisual3D.Material>

          <DiffuseMaterial  Viewport2DVisual3D.IsVisualHostMaterial="true" />

        </Viewport2DVisual3D.Material>


        <Button>3.5!</Button>          

      </Viewport2DVisual3D>

The above is a very quick overview of what is added in 3.5, so expect more posts on more specific details as well as some code samples on how to use it.

-Kurt Berglund

Posted by gsi
:

Of course I couldn't mention a technique of possible real-time cell-shading yesterday without actually trying it out. No, I didn't attempt to derive from BitmapEffect. (I'd love to take a crack at BitmapEffect but I simply cannot justify the expenditure of time.)

Instead, I tried the RenderTargetBitmap approach. Here's a rough outline:

  • Lay out your Page or Window normally but instead of defining a Viewport3D element, use a Border instead. The Border is perhaps the simplest FrameworkElement derivative that has a Background property. Give the Background property an object of type ImageBrush.
  • Whatever you would have put into your Viewport3D put into a Viewport3DVisual instead. Set the Viewport property of the Viewport3DVisual to the actual size of the Border element. You'll need a handler for the SizeChanged event of the Border to keep this Viewport property updated when the Border size changes.
  • In that same SizeChanged event handler for the Border, create an object of type RenderTargetBitmap the same size as the Border and the Viewport3DVisual. You'll be recreating this bitmap whenever the size of the Border changes.
  • Insteall event handlers for anything else (such as scrollbars) that affect the 3D scene defined within the Viewport3DVisual.
  • Whenever anything happens that affects the appearance of the Viewport3DVisual perform the following actions:
    • Clear the RenderTargetBitmap by calling the Clear method.
    • Render the Viewport3DVisual on the bitmap by calling the Render method.
    • Dump the pixel bits of the RenderTargetBitmap into an array by calling CopyPixels.
    • Do whatever processing you want on the pixel bits. (For cell-shading, I just AND-ed each 32-bit ARGB pixel with 0xFFC0C0C0.)
    • Create a new bitmap based on the altered pixel bits by calling BitmapSource.Create.
    • Set that new bitmap to the ImageSource property of the ImageBrush object set to the Background property of the Border.

Here's the RealTimeCellShading source code. Sorry I can't give you an XBAP, but apparently Clear and CopyPixels are prohibited methods for partial trust. (But Render and BitmapSource.Create are mysteriously OK. Hey — I don't make up the XBAP rules!)

I've used an AmbientLight at 1/4 white and DirectionalLight of 3/4 white with a direction of (2, –3 –1). I've provided a pair of scrollbars to rotate the camera relative to the teapot, and a pair of sliders to rotate the teapot relative to the camera and light sources. Here's a view with the teapot slightly rotated:

Posted by gsi
:

사용자가 지정한 여러가지 정보들을 ListBox에 표현하는 방법을 기술합니다.
하나의 사용자 정보에는 여러개의 정보가 포함되어 있으며,
그 정보를 ObservableCollection 와 같은 Collection의 객체로 리스트화 합니다.

본 내용은 WPF Application을 기초로 합니다.

** 사용자 데이터 구성**

public class Place
{
    private string _name;

    private string _state;

    public string Name
    {
        get { return _name; }
        set { _name = value; }
    }

    public string State
    {
        get { return _state; }
        set { _state = value; }
    }

    public Place(string name, string state)
    {
        this._name = name;
        this._state = state;
    }

    public override string ToString()
    {
        //return base.ToString();
        return _name.ToString();
    }
}

public class Places : ObservableCollection<Place>
{
    public Places()
    {
        Add(new Place("Bellevue", "WA"));
        Add(new Place("Gold Beach", "OR"));
        Add(new Place("Kirkland", "WA"));
        Add(new Place("Los Angeles", "CA"));
        Add(new Place("Portland", "ME"));
        Add(new Place("Portland", "OR"));
        Add(new Place("Redmond", "WA"));
        Add(new Place("San Diego", "CA"));
        Add(new Place("San Francisco", "CA"));
        Add(new Place("San Jose", "CA"));
        Add(new Place("Seattle", "WA"));
    }
}


**xaml에서 사용방법**
1. 네임 스페이스 추가
xmlns:c="clr-namespace:WpfApplication1"

2. Window.Resources에 클래스 등록
<Window.Resources>
        <c:Places x:Key="PlacesData" />
        ................
</Window.Resources>


3. 화면 구성
<StackPanel>
      <TextBlock FontSize="18" Margin="5" FontWeight="Bold"
                 HorizontalAlignment="Center">Data Trigger Sample</TextBlock>
      <ListBox Width="180" HorizontalAlignment="Center" Background="Honeydew"
                 ItemsSource="{Binding Source={StaticResource PlacesData}}"/>
</StackPanel>


아래와 같은 화면으로 구성이 됩니다.

사용자 삽입 이미지


위의 내용들을 보시면 하나같이 WpfApplication1.Place 라고 나옵니다.
이것은 Collection 내부에 있는 오브젝트의 값을 ToString를 통해서 기본 값을 가져 오기 때문인데요(말이 좀 그렇다^^) 여기서 ToString()를 오버라이트 해서 _name의 값을 리턴 하도록 해보겠습니다.

Place 클래스 내부에 ToString()를 추가합니다.
public override string ToString()
{
     return base.ToString();
}

추가를 하게 되면 위와 같은 코드가 자동으로 추가가 됩니다.

여기서 return base.ToString()return _name.ToString()로 바꾸어 주면
위의 내용이 아니라 이름으로된 결과물을 보실수 있을겁니다.

이후에는 Place에 있는 정보들을 다 보여 주는 템플릿을 구성할 수 있습니다. ^^

본 예제는 msdn 로컬 파일주소를 참조 하세요.
ms-help://MS.MSDNQTR.v90.en/wpf_conceptual/html/0f4d9f8c-0230-4013-bd7b-e8e7fed01b4a.htm
(물론 웹에도 같은게 있습니다. 주소는 직접 찾기 바랍니다. ^^..)
Posted by gsi
:

본 내용은 msdn에 있는
How to: Control When the TextBox Text Updates the Sources 에 대한 내용을
조금 나름대로 이해 할 수 있도록 정리한 것입니다.
영어는 잘 몰라서 번역 수준은 아닙니다.


TextBox의 Text는 기본적으로 UpdateSourceTrigger 의 값이 LostFocus로 되어 있다고 합니다. 그래서 Text를 다 적고 나서 마우스나 기타 다른 것을 통해서 Focus가 다른 데로 갔을때 업데이트가 되도록 되어 있습니다.

하지만 이 것을 Text를 입력 하고 있는 중간에 계속 해서 업데이트가 가능하게 할려면
UpdateSourceTrigger를 수정해줘야 하는거 같습니다.

즉, TextBox 의 Binding 속성을 사용해서 UpdateSourceTrigger의 값을 PropertyChanged로 수정해주어야 되는거 같네요.

블렌드에서 TextBox와 TextBlock을 사용해서 값을 Data Binding 해서 테스트를 해보면
값이 바뀌는것을 볼 수 있습니다.

하지만 지금 예제는 cs 파일을 통해서 연동하는 부분을 살펴 보게 되겠습니다.

Person.cs 파일을 하나 생성하게 되는데요.

1. 네임 스페이스 지정
using System.ComponentModel;

2. INotifyPropertyChanged를 상속 받는 클래스 생성
class Person : INotifyPropertyChanged
{
}


3. 데이터 값으로 name를 생성
private string name;

4. PropertyChangedEventHandler 이벤트 핸들 생성
public event PropertyChangedEventHandler PropertyChanged;

5. name를 사용할 인터페이스(??)를 생성, get, set 두개 지정
public string PersonName
{
    get { return name; }
    set
    {
        name = value;

        OnPropertyChanged("PersonName");
    }
}


6. PropertyChanged 를 처리할 함수 생성
protected void OnPropertyChanged(string name)
{
    PropertyChangedEventHandler handler = PropertyChanged;
    if (handler != null)
    {
        handler(this, new PropertyChangedEventArgs(name));
    }
}

cs 파일을 만든 다음에 xaml을 처리 합니다.
1. Person.cs 파일을 사용하기 위해서 네임 스페이스를 지정
xmlns:src="clr-namespace:UntitledProject1"

2. Window.Resources 에 Person의 키를 생성
<src:Person x:Key="myDataSource" PersonName="Joe"/>
 - x:Key="myDataSource" 를 하게 되면 Person의 생성자가 호출되는거 같네요.
 - PersonName="Joe" 를 하게 되면 public string PersonName 의 set 함수가
호출되는거 같습니다.

3. TextBox의 Text 속성에 바인딩 시킵니다.
<TextBox.Text>
    <Binding Source="{StaticResource myDataSource}" Path="PersonName"
                   UpdateSourceTrigger="PropertyChanged"/>
</TextBox.Text>
 - Source에는 Window.Resource에 Person을 선언해 놓은 myDataSource를 적용합니다. Path에는 PersonName를 추가 하게 되는데요. PersonName는 Person.cs 파일에 존재 하는 것입니다. (만약 xml을 사용하게 된다면 Path가 아니라 XPath가 되며 "PersonName"이 아니라 @"PersonName"가 됩니다.)
 - UpdateSourceTrigger="PropertyChanged"를 셋팅해 주게 됩니다.

4. TextBlock 의 Text 속성에 바인딩 시킵니다.
<TextBlock Text="{Binding Source={StaticResource myDataSource}, Path=PersonName}"/>
 - UpdateSourceTrigger 는 지정하지 않고 TextBox와 동일하게 구성합니다.
 - 위의 코드는 아래와 같이도 쓸수 있겠네요.
<TextBlock>
    <TextBlock.Text>
        <Binding Source="{StaticResource myDataSource}" Path="PersonName"/>
    </TextBlock.Text>
</TextBlock>


-----------------------------------------------------
작동 흐름을 대충 찍어 보면..

1. <src:Person x:Key="myDataSource" PersonName="Joe"/>
여기를 거치게 되면서
- public Person() 생성자가 호출 됩니다.
- public string PersonName 의 set에 value로 "Joe"가 입력 됩니다.
- OnPropertyChanged("PersonName"); 가 호출됩니다.
- OnPropertyChanged 내부에서는 handler가 null 이라서 그냥 빠져 나가네요.

2. Path="PersonName"
- 이 구문을 만나게 되면서 public string PersonName 이 호출되고 여기에서 name의 값을 get으로 리턴 시켜 줍니다.

3. TextBox의 Text에 내용 입니다.
- public string PersonName 의 set 가 호출 됩니다.
- OnPropertyChanged("PersonName"); 를 호출합니다.
- OnPropertyChanged() 내부에서 handler가 null이 아니게 되며, handler()를 호출하게 됩니다.
- public string PersonName 가 호출 되게 되는데요.. 음 아무래도 여기서, xaml의 코드를 거쳐서 TextBlock의 Text의 값이 변하게 되는거 같습니다.

**이상 간단하게 봤습니다.**

WPF를 하면서 C#의 스킬 부족과 영어 울렁증, xaml의 코드 난해함에.. 많이 헤매게 되는거 같습니다. 빨리 익혀서 이것저것 만들어 보는 날이 왔으면 좋겠네요 ^^.

강좌가 조금 난잡해 진거 같은데요.. ^^..
본 강좌의 소스는 인터넷의 msdn 사이트나 msdn을 설치 하셨다면 아래 주소에 있습니다.^^
ms-help://MS.MSDNQTR.v90.en/wpf_samples/html/b2906631-8a4b-43b4-b077-9e732a8ff363.htm (로컬msdn)

잘못된 부분이나 조금 도움이 될만한 내용이 있으시다면 적어 주시면 고맙겠습니다. ^^

Posted by gsi
:

화면에 보여지는 객체로 여기지 않고 Resource로 처리 하면서
화면의 다른 객체에 표현 가능하게 할려면 아래와 같은 코드로 변형 하면 됩니다.
이때 Grid의 x:Key 가 부여 되어야 합니다. ^^

 <Window.Resources>
  <Grid x:Key="KTestGrid" HorizontalAlignment="Left" Margin="38.857,8,0,0" x:Name="TestGrid" VerticalAlignment="Top" Width="151.786" Height="126.286">
   <Rectangle Margin="19.643,20.929,28.572,30.357" Stroke="#FF000000">
    <Rectangle.Fill>
     <LinearGradientBrush EndPoint="1,0.5" StartPoint="0,0.5">
      <GradientStop Color="#FFFF3838" Offset="0"/>
      <GradientStop Color="#FFFFFFFF" Offset="1"/>
     </LinearGradientBrush>
    </Rectangle.Fill>
   </Rectangle>
  </Grid>
 </Window.Resources>
Posted by gsi
:

VisualBrush 사용한 Grid 객체 렌더링 하기.


2D 형태의 객체를 3D 화면에 렌더링 하는 방법을 적을려고 합니다.
이때 사용하게 되는게 VisualBrush가 있는데요.
아래의 사용법을 가지고 처리해줄 수가 있습니다.


Window.Resource에 등록해서 할수도 있을듯 한데요.
이번 예제는 화면에 그려지고 있는 Grid를 3D 화면에 그려 보는것으로 마치겠습니다.

Start!!!

프로젝트를 생성합니다.
아래와 같이 WPF Application(*.exe)를 선택 합니다.
Name는 VisualBrushTest로 입력하고 Ok를 누릅니다.
사용자 삽입 이미지

Window를 선택하고 배경색은 검정 계통으로 보이게 합니다.
흰색일때는 왠지 테스트 하기가 불편한듯 해서 ^^.
사용자 삽입 이미지

VisualBrush로 사용할 Grid 객체를 선택하고 생성합니다.
사용자 삽입 이미지
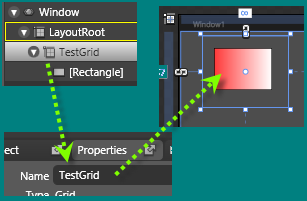
아래와 같이 테스트를 위해서 간단한 사각형을 Grid에 추가 하고 Grid의 이름을 부여 합니다.
사용자 삽입 이미지

Viewport3D 객체를 추가 해야 하는데요.
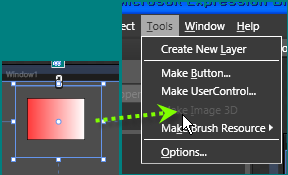
사실 이게 직접 xaml을 코딩 하기도 좀 번거롭고 해서 Tools에 있는 Make Image 3D
를 사용해 보겠습니다.
"TestGrid"를 선택하고 Make Image 3D를 바로 하면 좋겠지만. 이게 되지를 않습니다.
사용자 삽입 이미지

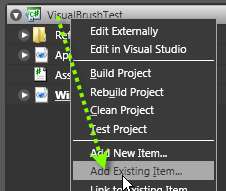
그래서 아래와 같이 우측의 Project 탭을 선택하고 VisualBrushTest를 선택한 후에
마우스 오른쪽 버튼을 클릭해서 컨텍스트 메뉴를 뛰우게 됩니다.
그리고 나서 Add Existing Item...를 선택 하게 됩니다.
선택후에 나오는 Add Existing Item 창에서 샘플로 사용할 이미지를 선택 합니다.
이 이미지는 나중에 지워도 괜찮은거니 아무거나 해주심 됩니다. ^^
사용자 삽입 이미지

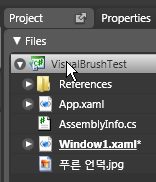
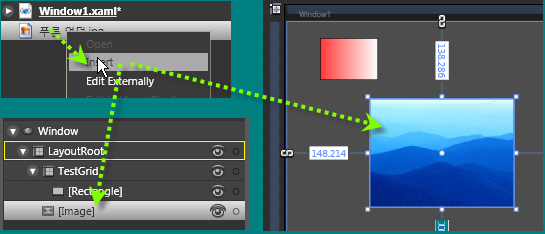
그림 샘플에 있는 이미지를 추가 해봤습니다. 아래와 같이 이미지가 추가 되었죠.
사용자 삽입 이미지

이 이미지를 선택한 후에 컨텍스트 메뉴에서 Insert를 해주면 화면에 표시가 되게 됩니다.
사용자 삽입 이미지

이제 Viewport3D를 만들어 보겠습니다.
Image 객체는 이 메뉴가 활성화 되어서 보이게 됩니다.
Tools>Make Image 3D...를 선택 합니다. 이제 Objects and Timeline 화면에 보시면
Image 가 Viewport3D로 되어 있는 것을 볼 수 있습니다.
중앙의 윈도우 화면의 이미지는 그대로 보이게 되죠.
트랜스폼이나 기타 조작을 해주지 않았으니 당연하겠죠 ^^.
사용자 삽입 이미지

화면을 3차원인거 처름 보이게 하기 위해서 조금 트랜스폼을 조작해 보겠습니다.
여기서는 방법이 몇가지 될수 있겠죠.
좌측의 메뉴를 이용해서 하는 방법을 우선 보겠습니다.
Camera Orbit 메뉴를 선택 하고 좌측의 Viewport3D를 선택하고 객체를 3차원으로
변형할 수 있습니다.
사용자 삽입 이미지
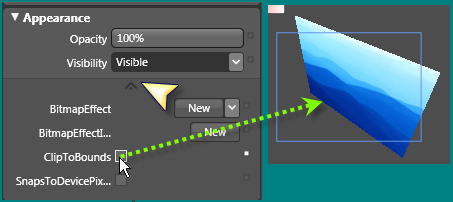
[참고] 위에서 보시는 이미지를 보면 Viewport3D의 화면 영역 안에서 clip되는걸
볼수 있습니다. 이것을 없애고 싶다면 아래의 체크 박스를 없애면 됩니다.
사용자 삽입 이미지

이제 샘플로 사용한 이미지를 없애고 위에서 작업한 Grid를 추가해 보겠습니다.
Design에서 XAML 페이지로 이동하고 나면 좀 많은 코드가 생기게 됩니다.
아까 "푸른언덕.jpg"를 추가 했으니 그쪽으로 가면 되겠죠...
사용자 삽입 이미지
위에서 보는 것과 같이 DiffuseMaterial.Brush에 VisualBrush를 붙여 보겠습니다.
사실 DiffuseMaterial 말고도 몇개 더 있다는 것을 3D를 해보신 분이라면 아실겁니다. ^^
자. 이제 아래와 같이 이 부분을 수정하게 됩니다. 우리가 아까 Grid의 이름을
TestGrid로 한거 기억 나시죠?. 아래와 같이 입력합니다.
사용자 삽입 이미지
아래와 같이 화면이 Grid와 같이 나오게 됩니다.
사용자 삽입 이미지

Blend 툴에서 Grid의 내용을 수정하거나 하면 동적으로 Viewport3D의 화면도
바뀌게 되어 있습니다.
보통 이게 동영상이나 기타반사 효과 또는 젖은 효과라고도 하던데요.
이런 트낌을 줄때 많이들 하게 되는거 같아요.

여기까지 해보신 분이라면 많은 생각이 될게 될거 같아요.
몇가지 개선 사항을 적어 볼까 합니다.

1. TestGrid를 Window.Resource에 추가 해서 화면에 보이지는 않지만 내부 데이터를
   접근하고 하면서 화면에는 Viewport3D 의 형태로 표현도 가능하죠.
2. 그리고 3DTools 라이브러리를 사용 하게 되면 Window Form도 여기에 붙여서
    3D 상에서의 윈도우 컨트롤이 가능하게 됩니다.

이거 말고도 다양한 효과를 줄 수 있을거 같아요.
이번 강좌는 여기까지 하고 3DTools를 이용한 외국 사이트의 내용을 나름대로
정리 해서 올릴까 합니다. 어쩔지 ^^.. 많은 의견 주세요.

Posted by gsi
:

Storyboard 를 사용한 TransformGroup를 C#에서 처리 하는 방법


Blend에서 Timeline을 생성하고 오브젝트를 움직이면 에니메이션 처리를 할수 있다.
가장 간단하게 하면서도 효과적인 에니메이션을 구현할 수 있다.

에니메이션 쪽을 보면 Transform에 여러개의 객체가 붙을수 있다.

만약 Button 의 이름이 btn이라고 하고 예로 들어 보겠다.

btn.RenderTransform 에 붙을수 있는 것은 아래와 같을 것이다.

btn.RenderTransform = new RotateTransform(0);
btn.RenderTransform = new ScaleTransform(1, 1);
btn.RenderTransform = new SkewTransform(0, 0);
btn.RenderTransform = new TranslateTransform(10, 10);


그리고 위의 4개를 통합해서 사용할 수 있는것으로 TransformGroup를 들수 있다.

...
btn.RenderTransform = tGroup;


위에서 보는 것과 같이 5개의 속성을 연결 시킬 수가 있다.

몇가지 테스트를 해봤고,
RenderTransform에 TransformGroup를 붙이지 않고 개별적인
속성을 붙이게 되면 Animation할때도 그 속성에 대한 정보만 제어 할 수 있다.
즉, 이동만을 하고 싶은 것이라면 TranslateTransform만 연결해서 사용하면 될듯 하다.

구체적인 예제를 만들지는 않았지만.
궁금하면 질문 해주기 바랍니다.

아래의 코드는 4개의 속성 정보를 다 연동하고 난 후에 제어 하는
아주 심플한 예제 입니다.
물론 자료형을 사용해서 배열로 정보들을 저장하고 조금더
깔끔하고 효과적으로 처리 할 수도 있을거 같다.
그리고 현재 코드는 2D의 처리만 가능한 것이다.

-------------------------------------------------------------------------
전제조건 :
Blend에서 기본 오브젝트를 우선 제작한다.
1. 버튼 두개를 제작한다.
2. 텍스트 박스를 하나 만든다. 이름은 TextBox2로 지정한다.

자.. 프로그램 코드는 *.cs 파일에서만 구동되므로 바로 설명 하겠다.

제어에 필요한 변수를 아래와 같이 만들었습니다.

//에니메이션 이름에 사용할 것을 지정
private string aniTrans = "_aniTrans";
private string aniSkew = "_aniSkew";
private string aniScale = "_aniScale";
private string aniRotate = "_aniRotate";

//트랜스폼을 제어 하기 위해서 변수를 설정
private TransformGroup group;
private RotateTransform rotate;
private ScaleTransform scale;
private SkewTransform skew;
private TranslateTransform trans;

//스토리 보드의 속성정보를 저장할 변수 설정
private Storyboard transStoryX;
private Storyboard transStoryY;
private Storyboard RotateStory;

//에니메이션 변수 설정
private DoubleAnimation myTransX;
private DoubleAnimation myTransY;
private DoubleAnimation myRotate;

public Window1()
{
    ...
    group = new TransformGroup();
    rotate = new RotateTransform(0);
    scale = new ScaleTransform(1, 1);
    skew = new SkewTransform(0, 0);
    trans = new TranslateTransform(50, 50);

    group.Children.Add(rotate);
    group.Children.Add(scale);
    group.Children.Add(skew);
    group.Children.Add(trans);

    this.RegisterName(aniTrans, trans);
    this.RegisterName(aniSkew, skew);
    this.RegisterName(aniScale, scale);
    this.RegisterName(aniRotate, rotate);

    TextBox2.RenderTransform = group;
}

private void OnLoaded(object sender, RoutedEventArgs e)
{
    myTransX = new DoubleAnimation();
    myTransY = new DoubleAnimation();
    myRotate = new DoubleAnimation();

    Storyboard.SetTargetName(myTransX, aniTrans);
    Storyboard.SetTargetProperty(myTransX, new PropertyPath(TranslateTransform.XProperty));
    Storyboard.SetTargetName(myTransY, aniTrans);
    Storyboard.SetTargetProperty(myTransY, new PropertyPath(TranslateTransform.YProperty));
    Storyboard.SetTargetName(myRotate, aniRotate);
    Storyboard.SetTargetProperty(myRotate, new PropertyPath(RotateTransform.AngleProperty));

    transStoryX = new Storyboard();
    transStoryX.Children.Add(myTransX);
    transStoryY = new Storyboard();
    transStoryY.Children.Add(myTransY);
    RotateStory = new Storyboard();
    RotateStory.Children.Add(myRotate);
}

private void OnClick(object sender, RoutedEventArgs e)
{
    myTransX.To = -50;
    myTransX.Duration = new Duration(TimeSpan.FromMilliseconds(800));
    myTransY.To = -50;
    myTransY.Duration = new Duration(TimeSpan.FromMilliseconds(800));
    myRotate.To = -50;
    myRotate.Duration = new Duration(TimeSpan.FromMilliseconds(800));

    transStoryX.Begin(this);
    transStoryY.Begin(this);
    RotateStory.Begin(this);
}

private void OnClick2(object sender, RoutedEventArgs e)
{
    myTransX.To = 120;
    myTransX.Duration = new Duration(TimeSpan.FromMilliseconds(800));
    myTransY.To = 150;
    myTransY.Duration = new Duration(TimeSpan.FromMilliseconds(800));
    myRotate.To = 270;
    myRotate.Duration = new Duration(TimeSpan.FromMilliseconds(800));

    transStoryX.Begin(this);
    transStoryY.Begin(this);
    RotateStory.Begin(this);
}


아.. 내용이 많아 지네욤..

우선 한번만 지정하는 부분과 매번 동작상황에 맞게 값을 입력해줘야 하는것으로
세분화를 해봤습니다.
Windows1()에 있는 내용은 기본적으로 설정할 부분이며,

OnClick(), OnClick1() 에는 버튼에 대한 이벤트 입니다.
아무래서 여기서 From, To, Duration을 설정해 줘야 할듯 합니다.

아. 참고로 From을 설정하지 않으면 현재 위치에서 To까지의 진행을
하게 됩니다. 처음에 이게 궁금했는데 아주 편한듯 합니다. ^^

그리고 Storyboard 여기 설정하는 부분이 솔직이 아직 다 이해가 가질 않습니다.
위의 코드 처름 하나하나의 속성을 처리 하는 부분에서는 별다른
문제가 없지만 path 형태의 처리는 아직 공부 중입니다. ^^

음.. 대충 설명은 이것으로 마치겠습니다.
샘플 받아서 실행해 보시고 분석해 보시면 더 도움 될거 같아욤.
아무쪼록 좋지 않은 내용을 봐주셔서 감사 ^^

Posted by gsi
:

Cube3D - WPF 3D

WPF 2007. 8. 30. 17:57 |

본 내용은 인터넷에서 받은 자료를 사용해서 작성한 것입니다.
영어권이 아닌 다른 곳이지만. 코드만 봐도 알수 있을 정도로 잘 정리 되어 있네요.

사각형 큐브를 3차원으로 구성하고 3D의 페이스에 동영상이나 2D 컨트롤 패널을
추가 할 수가 있습니다.

사용자 삽입 이미지

관련 자료 링크 : http://www.unitedstatesof.net/stuff/2007-03-19_WPF_Tutorial/WPF.pdf

Posted by gsi
:

Overview

A collection of tools to help developers using the 3D features in the Windows Presentation Foundation.

Some of things you will find inside:
  • Code to interact with 2D content placed on 3D
  • Trackball class to Rotate the camera using the mouse
  • ScreenSpaceLines3D to draw fixed width lines in a 3D scene
  • Texture coordinate generators

Current status: Released - please go to the "Releases" tab to download the latest source and binaries.
Audience: Beginner, Intermediate, Advanced
Language: C#
관련 주소 : http://www.codeplex.com/3DTools

내용.
해당 라이브러리를 사용하게 되면 3D의 표면에 Grid와 같은 패널의 내용을 맵핑 할 수가 있습니다. 3차원의 화면에 2차원의 각종 컨트롤을 처리 할 수가 있습니다.
그리고 트랙볼 구현도 쉽게 되니 활용하기 좋은 자료인듯 합니다.
Posted by gsi
: