GSI

WebBrowser 처리방식.. 참..

WPF 2009. 12. 7. 06:09 |


2일 정도 자료를 찾아 보고 했지만.
WebBrowser 는 왜 WPF의 렌더링 방식과 차이가 있는지 모르겠다.
왜냐하면 WebBrowser 위에 다른걸 그리고 싶었지만.
되지 않더라..

그래서 자료를 보다 보니. BitmapSource 라는걸 사용해서 WPF의 렌더링 방식에
맞출수 있다는걸 알았다.
뭐 용어는 잘 모르겠고 암튼 이런 방식인게다. 쩝..
산넘어 산인거지..

우선 이걸 해결 하고 나니 몇가지 더 테스트 할게 남아 있다.
실제 WebBrowser는 숨겨 놓고 Image 같은데 실시간으로 뿌리면서 드로잉 해야 한다는 것과
숨겨 놓은 웹의 Mouse, Keyboard 등의 접근을 또 어떻게 처리 해야 하느냔데..

암튼 더 고민해봐야 할듯 하다.
아래 자료는 최종 코드...

-- Source --
<Window x:Class="WpfApplication1.Window1"
    xmlns="http://schemas.microsoft.com/winfx/2006/xaml/presentation"
    xmlns:x="http://schemas.microsoft.com/winfx/2006/xaml"
    Title="Window1" Height="600" Width="1000" xmlns:my="clr-namespace:System.Windows.Forms.Integration;assembly=WindowsFormsIntegration">

    <Grid>
        <WebBrowser x:Name="webbrowser" Source="http://www.naver.com" Margin="0,0,437,199" />
       
        <Button Height="23" HorizontalAlignment="Right" Margin="0,104,307,0" Name="button1" VerticalAlignment="Top" Width="75" Click="button1_Click">Button</Button>
        <Image HorizontalAlignment="Right" Margin="0,178,18,21" Name="image1" Stretch="Fill" Width="399" />
    </Grid>

</Window>

..
using System;
using System.Collections.Generic;
using System.Linq;
using System.Text;
using System.Windows;
using System.Windows.Controls;
using System.Windows.Data;
using System.Windows.Documents;
using System.Windows.Input;
using System.Windows.Media;
using System.Windows.Media.Imaging;
using System.Windows.Navigation;
using System.Windows.Shapes;
using System.IO;
using System.Drawing;
using System.Drawing.Imaging;
using System.Runtime.InteropServices;


namespace WpfApplication1
{
    /// <summary> 
    /// Interaction logic for Window1.xaml 
    /// </summary> 
    public partial class Window1 : Window
    {
        BitmapSource bitmapsource = null;

        [DllImport("user32.dll", SetLastError = true)]
        static extern bool PrintWindow(IntPtr hwnd, IntPtr hDC, uint nFlags);

        [DllImport("gdi32.dll")]
        public static extern bool DeleteObject(IntPtr hObject);
       
        public Window1()
        {
            InitializeComponent();
        }

        BitmapSource GetScreenInt()
        {
            Bitmap bm = new Bitmap((int)300, (int)300);
            IntPtr hBitmap = bm.GetHbitmap();
            Graphics g = Graphics.FromImage(bm);
            PrintWindow(this.webbrowser.Handle, g.GetHdc(), 0);

            g.ReleaseHdc();

            g.Flush();

            BitmapSource src = System.Windows.Interop.Imaging.CreateBitmapSourceFromHBitmap(bm.GetHbitmap(), IntPtr.Zero, Int32Rect.Empty,
                System.Windows.Media.Imaging.BitmapSizeOptions.FromEmptyOptions());
            src.Freeze();

            bm.Dispose();
            bm = null;
            DeleteObject(hBitmap);

            return src;

        }
       
        private void button1_Click(object sender, RoutedEventArgs e)
        {
            this.image1.Source = null;
            this.image1.Source = GetScreenInt();
        }
    } 
}

Posted by gsi
:


이 오류가 뭔지 처음에는 많이 애매했다.
이게 나온 경우는 아래와 같다.

UnitProject로 사용자 정의 컨트롤을 하나 만들었습니다.
그리고 테스트가 제대로 되서
메인 프로젝트에 해당 Xaml, cs 파일의 내용을 그대로 복사

그렇게 했을때 오류가 발생하더라구요.

오류 CS0103: 'InitializeComponent' 이름이 현재 컨텍스트에 없습니다.

왜 나왔냐.. 찾아 보니까 문제는 네임스페이스였습니다.

xaml 코드에서 x:Class="WpfApplication1.ucStartup" 라는 부분이 있었는데
메인 프로젝트의 네임 스페이스는 WpfApplication1 이게 아니였기 때문입니다.

그렇다 보니 cs 파일의 생성자 부분의 'InitializeComponent'  메소드가 네임스페이가 틀리게 되면
호출되지 않게 됩니다.

그러면 'InitializeComponent'  이 메소드는 어디 있는가?

이건 컴파일 타임에서 생성되며 보통 Xaml 파일이 obj/Debug/**.g.cs 파일로 만들어 지는데요.
그 속에 존재를 하게 됩니다.

뭐.. 잘만 하면 나오지 않는 오류이지만, 어떤 오류인지 알고 나니 더 좋다고나 할까요? ^^
Posted by gsi
:

스토리 보드를 사용할때 에니메이션이 끝나고 다른걸 처리 하는 경우가 많다.
<Storyboard x:Key = "ZoomInImage" Completed = "ZoomFinished">
...

위와 같은 코드가 xaml 파일에 존재 하면
cs 파일에는 Completed의 이벤트 메소드가 선언되어 있어야 한다. (블랜드에서도 자동으로 생성하게 된다.)

private void ZoomFinished(object sender, EventArgs e)
{
Window1 parentWindow = Window.GetWindow(this) as Window1;
parentWindow.UpdateDisplay(FolderPath);
}

위와 같이 sender로 전달되어온 Storyboard 의 부모 윈도우를 얻을때 GetWindow() 를 통해서
가져올 수 있다.
Posted by gsi
:

Kaxaml 1.0 Tool

WPF 2008. 6. 1. 10:45 |


http://www.google.co.kr/imgres?imgurl=http://thewpfblog.com/images/yahoo1.jpg&imgrefurl=http://www.snowball.be/CategoryView,category,WPF.aspx&h=473&w=630&sz=261&tbnid=RkGYSUpLU1QJ:&tbnh=103&tbnw=137&prev=/images%3Fq%3Dwpf&hl=ko&sa=X&oi=image_result&resnum=15&ct=image&cd=3

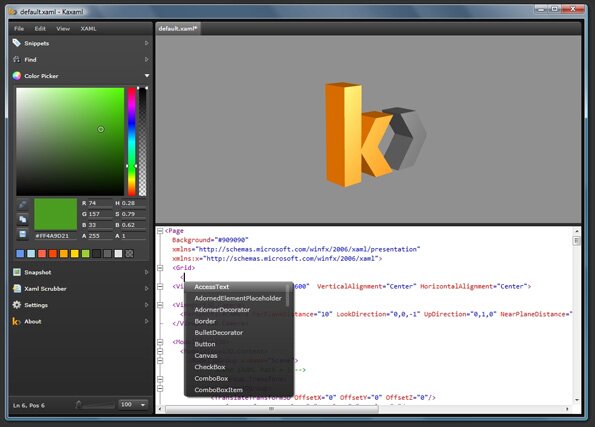
Welcome to Kaxaml!

Kaxaml is a lightweight XAML editor that gives you a "split view" so you can see both your XAML and your rendered content (kind of like XamlPad but without the gigabyte of SDK). Kaxaml is a hobby and was created to be shared, so it's free! Feel free to download and try it out. If you don't like it, it cleans up nicely.

Posted by gsi
:

사용자 삽입 이미지

본 내용은 자료가 좀 많다. -.-
우선 정리는 시간이 걸리기 때문에 차후에 해야 할거 같다.

간단하게 정리 하면...
Employee 라는 직원 정보를 담고 있는 클래스를 하나 제작한다.
Button의 Content의 프로퍼티를 Employee 객체로 설정하여 버튼을 확장하는 예제이다.
여기에서 사용되는 내용은 ContentTemplate, DataTemplate, DataTemplateSelector, DataTemplate.Triggers 등에 대한 내용을 담고 있다.
(이 내용은 WPF 서적의 25장. 템플릿의 내용이다.)

관련소스 :
Posted by gsi
:

사용자 삽입 이미지
  • ControlTemplate 태그 내에는 TargetType 속성을 포함하는 것이 가능하다.
    <ControlTemplate x:Key="btnCustom" TargetType="{x:Type Button}">
    이 경우 TemplateBinding 표현에서 의존 프로퍼티의 클래스 이름을 앞에 붙일 필요는 없다. 바인딩에는 이 프로퍼티를 참조하라는 정보가 들어 있기 때문.
  • 여러개의 컨트롤이 템플릿을 공유할때 리소스로 정의해야 한다.
  • btnCustom이라는 x:Key를 가진 ControlTemplate을 정의한 스탠드 얼론 xaml파일이 있다.
  • ControlTemplate 상에 TargetType 속성을 설정한 이유는 의존 프로퍼티나 이벤트 앞에 반복해서 클래스 이름을 붙이지 않기 위함이다.
  • Posted by gsi
    :

    사용자 삽입 이미지

    Posted by gsi
    :

        public partial class UserControl1 : UserControl
        {
            public static DependencyProperty InputTextProperty;

            public UserControl1()
            {
                InitializeComponent();
           
                //
                InputTextProperty = DependencyProperty.Register("InputText", typeof(string),
                                typeof(UserControl1),
                                new FrameworkPropertyMetadata("none", new PropertyChangedCallback(OnInputTextChanged)));
            }

            public string InputText
            {
                set { SetValue(InputTextProperty, value); }
                get { return (string)GetValue(InputTextProperty); }
            }
             
            private void OnInputTextChanged(DependencyObject sender, DependencyPropertyChangedEventArgs e)
            {
                TextBlock tb = this.FindName("txtShow") as TextBlock;

                tb.Text = InputText;
            }
        }

    관련코드 :

    Posted by gsi
    :

    [WPF] 마우스 이벤트

    WPF 2007. 11. 29. 13:27 |

    마우스 이벤트에 대해서..

    객체가 있을때 마우스 이벤트를 사용해서 많은 기능을 처리해줘야 한다.

    공부 하면서 알게된 내용을 적을려고 한다.

    예를 들어서

    Grid
       > Rectangle

    이와 같은 객체가 있다고 가정하겠다.
    그리고 마우스 이벤트는 Grid에 생성한다.
    MouseLeftButtonUp 이벤트를 생성했을때 아래와 같은 함수가 생성되게 된다.

    private void OnGridLButtonUp(object sender, MouseButtonEventArgs e)
    {

    여기서 sender는 Grid를 의미 하며, e는 마우스의 각종 상황들에 대한 정보를 가지고 있는다.

    내가 여기서 해주고자 했던건 Grid의 내부 마우스 클릭 위치값을 가져 오기 위함이기 때문에
    아래와 같은 작업을 해주었다.

    마우스의 위치를 얻어 오기 위해서
    Point pt = e.GetPosition((Grid)sender);
    이런 구문을 사용했다.

    GetPosition에는 현재 선택된 객체를 인자로 넘겨 주게 되면 그 객체에 대한 로컬 위치값이
    나오게 되는거 같다.
    Posted by gsi
    :

    데이터 바인딩#1 - 기본
    데이터 바인딩#2 - Binding Mode
    데이터바인딩#3 - DataContext
    데이터 바인딩#4 - TextBox vs Run
    데이터 바인딩#5 - FrameWorkElement Demo
    데이터 바인딩#6 - IValueConverter


    이번 시간에는 변환에 대해서 알아 보겠습니다. 데이터 바인딩을 하다 보면 간혹 다른 타입의 데이터를 변환해서 사용해야 하는 경우가 발생합니다. 칼라 값을 변환해서 사용한다던지 아니면 실수형 데이터를 정수형 데이터로 변환해서 사용한다던지 하는 과정을 처리 해야 하는데요 이때 사용할 수 있는 것이 IValueConverter 인터페이스 입니다.

    변환을 수행하는 클래스를 제작할때 반드시 IValueConverter 인터페이스를 구현해야 합니다.
    그 형태는 아래와 같습니다.

    public class MyConverter : IValueConverter
    {
       public object Convert(object value, Type typeTarget,
                                                      object param, CultureInfo culture)
       {
          ...
       }

       public object ConvertBack(object value, Type typeTarget,
                                                        object param, CultureInfo culture)
       {
          ...
       }
    }

    value 인자는 변환될 객체이고 typeTarget는 변환될 객체의 타입입니다.
    세번재 인자인 param은 Binding할때 ConvertParameter 프로퍼티가 명시한 객체가 들어가게 됩니다. 그리고 마지막 객체는 대부분 무시 됩니다.

    그리고 변환을 위해서는 Convert, ConvertBack 두개가 반드시 필요 합니다.

    C#에서는 아래와 같이 수행할 수 있습니다.
    Binding bind = new Binding(); bind.Convert = new MyConverter();


    아래의 코드는 Convert의 내용입니다.

        [ValueConversion(typeof(double), typeof(decimal))]
        class DoubleToDecimalConverter : IValueConverter
        {
            public object Convert(object value, Type typeTarget, object param, CultureInfo culture)
            {
                decimal num = new decimal((double)value);

                if (param != null)
                    num = Decimal.Round(num, Int32.Parse(param as string));

                return num;
            }

            public object ConvertBack(object value, Type typeTarget, object param, CultureInfo culture)
            {
                return Decimal.ToDouble((decimal)value);
            }
        }

    여기서 보시면 위쪽의 [ValueConversion(typeof(double), typeof(decimal))] 의 내용은 사실상 없어도 에러가 나거나 하지는 않습니다. 하지만 WPF 문서에서 보게 되면 이 구문을 클래스 정의의 바로 밑에 포함하게 권고 하고 있습니다. 제가 봐도 들어가 있을때 가독성 부분에서는 조금더 유연해 지지 않을까 생각 됩니다.

    Convert를 xaml 코드에 연동하는 부분은 이전 강좌의 소스 코드 부분에 바로 적용해봤습니다.

    <Window x:Class="WpfApplication1.Window1"
        xmlns="http://schemas.microsoft.com/winfx/2006/xaml/presentation"
        xmlns:x="http://schemas.microsoft.com/winfx/2006/xaml"
        xmlns:src="clr-namespace:WpfApplication1"
        Title="Window1" Height="300" Width="300">

        <Window.Resources>
            <src:DoubleToDecimalConverter x:Key="conv" />
        </Window.Resources>

        <StackPanel>
            <ScrollBar  Orientation="Horizontal"
                        Margin="24"
                        Maximum="100"
                        LargeChange="10"
                        SmallChange="1"
                        Value="{Binding ElementName=Simple, Path=Number, Mode=OneWayToSource}" />
           
            <src:SimpleElement x:Name="Simple" HorizontalAlignment="Center" />
           
            <ScrollBar  Name="scroll"
                        Orientation="Horizontal"
                        Margin="24"
                        Maximum="100"
                        LargeChange="10"
                        SmallChange="1"
                        Value="{Binding ElementName=Simple, Path=Number, Mode=OneWay}" Height="17" />
           
            <src:SimpleElement HorizontalAlignment="Center" Number="{Binding ElementName=scroll, Path=Value, Mode=OneWay, Converter={StaticResource conv}, ConverterParameter=2}" Height="50" />
        </StackPanel>
    </Window>

    xaml 코드에서는 위에서와 같이 Resource에서 IValueConverter를 구현하는 클래스를 명시해 주어야 합니다.
    그리고 Binding 정의에서는 위에서와 같이 Converter={StaticResource conv}, ConverterParameter=2 를 해주시게 되면 됩니다.

    추가적으로 public의 프로퍼티가 있을 경우 값을 추가한 후에 정보 전달도 가능합니다.
    <src:DoubleToDecimalConverter Decimals="4" x:Key="conv" />
    (Decimals 라는 public 프로퍼티가 선언되어 있다고 가정할때)

    위의 코드의 결과는 이전의 강좌에서 소수점으로 쫙 나열되어 있는 정보를 소수 둘째 자리까지 자른후에 표시 할 수 있는 코드 입니다. ^^

    그럼.. 오늘 강좌는 여기까지 ^^..
    다음 강좌는 MultiBinding를 작성하도록 하겠습니다.

    참고 ^^
    본 내용은 "찰스페졸드의 WPF"의 내용을 이해 하고 나름 생각과 같이 정리한 겁니다.
    제제가 가해질 경우 바로 삭제하도록 하겠습니다. ^^;
    Posted by gsi
    :

    데이터 바인딩#1 - 기본
    데이터 바인딩#2 - Binding Mode
    데이터바인딩#3 - DataContext
    데이터 바인딩#4 - TextBox vs Run
    데이터 바인딩#5 - FrameWorkElement Demo
    데이터 바인딩#6 - IValueConverter

    저번 시간까지 텍스트에 대해서 알아 봤습니다.
    이번 시간은 FrameElement를 사용하게 되면 좋은 효과를 볼 수 있는 데모를 보면서 의존 프로퍼티의 장점을 보도록 하겠습니다.

    의존 프로퍼티 시스템은 내부에 통보 장치가 구현되어 있어서 바인딩 소스가 의존 프로퍼티가 될 필요가 없지만 의존 프로퍼티일 경우 상당히 유용해질 수 있습니다.
    이 말은 소스가 의존 프로퍼티가 없어도 타겟의 경우 소스의 값을 참조 할 수 있지만, 의존 프로퍼티가 있을 경우 통지 메시지를 받을수 있어서 소스이지만 타깃의 기능을 사용할 수 있다 정도로 이해 하시고 다음 소스를 보시면 더 이해가 빠를 겁니다.

    우선  FrameWorkElement 를 상속받은 클래스를 하나 생성합니다.

    using System;
    using System.Globalization;
    using System.Windows;
    using System.Windows.Media;

    namespace WpfApplication1
    {
        class SimpleElement : FrameworkElement
        {
            // DependencyProperty 정의
            public static DependencyProperty NumberProperty;

            // 정적 생성자에 DependencyProperty 생성
            static SimpleElement()
            {
                NumberProperty =
                    DependencyProperty.Register("Number", typeof(double),
                        typeof(SimpleElement),
                        new FrameworkPropertyMetadata(0.0,
                            FrameworkPropertyMetadataOptions.AffectsRender));
            }

            // DependencyProperty를 CLR 프로퍼티를 노출
            public double Number
            {
                set { SetValue(NumberProperty, value); }
                get { return (double)GetValue(NumberProperty); }
            }

            // MeasureOverride를 오버라이딩해 크기를 하드 코딩
            protected override Size MeasureOverride(Size availableSize)
            {
                //return base.MeasureOverride(availableSize);
                return new Size(200, 50);
            }

            // Number 프로퍼티를 보여주는 OnRender
            protected override void OnRender(DrawingContext dc)
            {
                dc.DrawText(
                    new FormattedText(Number.ToString(),
                        CultureInfo.CurrentCulture, FlowDirection.LeftToRight,
                        new Typeface("Times New Roman"), 12,
                        SystemColors.WindowTextBrush),
                        new Point(0, 0));
            }
        }
    }


    이 클래스는 double라는 double 타입의 프로퍼티를 하나 정의 했습니다. 이 프로퍼티는 NumberProperty라는 DependencyProperty의 지원을 받게 됩니다.
    FrameworkPropertyMetadata 는 초기값이 0 이며, 프로퍼티에 변화가 생기면 OnRender가 호출되고 화면이 갱신 됩니다.

    이제 이 코드를 적용할 xaml 코드를 보겠습니다.
    <Window x:Class="WpfApplication1.Window1"
        xmlns="http://schemas.microsoft.com/winfx/2006/xaml/presentation"
        xmlns:x="http://schemas.microsoft.com/winfx/2006/xaml"
        xmlns:src="clr-namespace:WpfApplication1"
        Title="Window1" Height="300" Width="300">
       
        <StackPanel>
            <ScrollBar  Orientation="Horizontal"
                        Margin="24"
                        Maximum="100"
                        LargeChange="10"
                        SmallChange="1"
                        Value="{Binding ElementName=Simple, Path=Number, Mode=OneWayToSource}" />
           
            <src:SimpleElement x:Name="Simple" HorizontalAlignment="Center" />
           
            <ScrollBar  Name="scroll"
                        Orientation="Horizontal"
                        Margin="24"
                        Maximum="100"
                        LargeChange="10"
                        SmallChange="1"
                        Value="{Binding ElementName=Simple, Path=Number, Mode=TwoWay}" />
           
            <src:SimpleElement HorizontalAlignment="Center" Number="{Binding ElementName=scroll, Path=Value, Mode=OneWay}"/>
        </StackPanel>
    </Window>

    SimpleElement 엘리먼트상의 x:Name 속성은 FrameworkElement를 상속받지 않은 XAML 엘리먼트를 위한 속성이다. 이 엘리먼트들은 Name 프로퍼티가 없기 때문에 Name 프로퍼티를 사용할 경우에는 에러가 발생한다. 이 에러는 "SimpleElement가 동일한 어셈블리에서 구현되었기 때문에 Name 속성 대신에 x:Name 속성을 사용해야함" 이다.

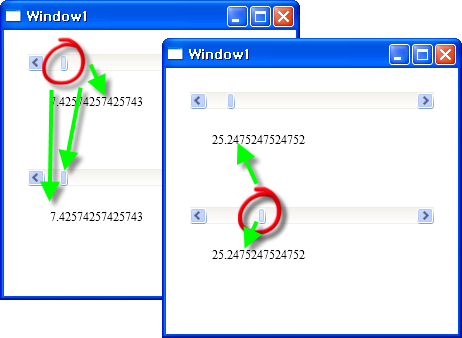
    이 내용을 사용해서 행동을 해보면 아래와 같은 행동이 일어 난다.
    첫 번째 ScrollBar를 움직이면  나머지 모든 정보가 바뀌게 된다.
    두 번째 ScrollBar를 움직이면 첫 번째 ScrollBar는 움직이지 않는다.

    사용자 삽입 이미지


    첫 번째 ScrollBar는 OneWayToSource로 되어 있기 때문에 ScrollBar가 타깃이 되지만 내부적으로는 소스형태가 되는 것이다. 이전 강좌에서 말한 것처름 타깃이 소스로 날아 가는거라고 했다. 즉, ScrollBar의 값이 SimpleElement로 전달 되게 되는 것이다. 이것은 SimpleElement가 의존 프로퍼티의 형태를 뛰지 않았을때를 가정한다.

    두 번째 ScrollBar는 TwoWay 형태를 취하고 있기 때문에 Element 로 값을 업데이트 하게 된다. x:Name 를 가지고 있는 SimpleEment로도 값을 보내게 되는 것이다.

    설명은 여기 까지며 덫붙여 설명하면,

    SimpleElement() 에 포함되어 있는 FrameworkPropertyMetadataOptions 의 옵션에는 데이터 바인딩을 처리해 줄 수 있는 옵션들이 포함되어 있다.

    두 번째 ScrollBar의 Mode=OneWay를 하게 되면 첫 번째 ScrollBar와 연동되지 않으며,
    첫번째 SimpleElement와도 연동되지 않는다.
    OneWay로 하게 되면 위쪽의 SimpleEment의 값을 타깃으로 받을 수만 있고 넘겨 줄 수가 없게 되는 것이다.

    이번 강좌는 여기까지 ^^.
    OneWay, TwoWay, OneWayToSource에 대해서 조금은 더 테스트를 해보면서
    확실하게 알아갈 필요가 있는듯 합니다.
    FrameWorkElement의 이용에 대해서도 한번더 이해를 할 수 있는 시간이였습니다.

    모두 수고 ^^

    참고 ^^
    본 내용은 "찰스페졸드의 WPF"의 내용을 이해 하고 나름 생각과 같이 정리한 겁니다.
    제제가 가해질 경우 바로 삭제하도록 하겠습니다. ^^;
    Posted by gsi
    :

    WPF Healthcare Demo

    WPF 2007. 11. 21. 09:40 |

    Friday, February 16

    Impress your friends showcasing WPF

    Copie d'écrande l'application WPF Patient monitoringYou surely already have seen demonstrations of the applications which can be made using Windows Presentation Foundation (formerly Avalon). At events like the Ready For a New Day Launch, for instance.

    Among those, did you see that impressive healthcare monitoring application with pages rotating in 3D? Well, it's available now, together with its source code. It runs on Windows Vista, but also on Windows XP (provided you install the .net framework 3.0). Just download it there, and run it (it's already compiled).

    Unzip it, go to the Healthcare_Prototype\sources\Avalon Patient Monitoring\bin\Release directory and double click Avalon Patient Monitoring.exe. And impress your friends.

    From a technical standpoint: what's impressive is not as much the result (such applications could be made before WPF) as the fact this kind of applications can be created easily, quickly and in an elegant way with WPF. In the ZIP file you'll get, there's a PowerPoint document explaining what's behind the application.

    Posted by gsi
    :

    데이터 바인딩#1 - 기본
    데이터 바인딩#2 - Binding Mode
    데이터바인딩#3 - DataContext
    ▶데이터 바인딩#4 - TextBox vs Run
    데이터 바인딩#5 - FrameWorkElement Demo
    데이터 바인딩#6 - IValueConverter


    소스 정보를 사용해서 타겟에 적용할때 텍스트로 원하는 형태의 문자열로 만들어서 하고 싶을때가 있다.
    아래의 예제를 보자.

    <Window x:Class="WpfApplication1.Window1"
        xmlns="http://schemas.microsoft.com/winfx/2006/xaml/presentation"
        xmlns:x="http://schemas.microsoft.com/winfx/2006/xaml"
        Title="Window1" Height="300" Width="300" Name="window">

        <StackPanel Orientation="Horizontal"
                    HorizontalAlignment="Center" VerticalAlignment="Center"
                    DataContext="{Binding ElementName=scroll}" Name="stackpanel">
            <TextBlock Text="{Binding ElementName=window, Path=ActualWidth}" />
            <TextBlock Text=" &#x00D7;" />
            <TextBlock Text="{Binding ElementName=window, Path=ActualHeight}" />
            <TextBlock Text=" Device independent units"/>
        </StackPanel>

    </Window>

    실행해 보면 300 x 300 device independent units 라는 글자를 볼 수 있다.
    TextBlock를 여러개 써서 하는거 자체가 조금 어울리지 않아 보인다. 그래서 Run 을 사용하는 코드를 적용하게 되면 조금더 코드가 깔끔해지게 된다.

    아래의 코드는 TextBlock로 이루어진 부분을 Run으로 처리한 내용이다.

            <TextBlock>
                <Run Text="{Binding ElementName=window, Path=ActualWidth}" />
                <Run Text=" &#x00D7;" />
                <Run Text="{Binding ElementName=window, Path=ActualHeight}" />
                <Run Text=" Device independent units" />
            </TextBlock>

    하지만 이 코드를 쓰게 되면 아래와 같은 에러 코드를 보게 된다.
    Error 1 A 'Binding' cannot be set on the 'Text' property of type 'Run'. A 'Binding' can only be set on a DependencyProperty of a DependencyObject. D:\temp4\WpfApplication1\WpfApplication1\Window1.xaml 15 24 WpfApplication1

    이 에러가 나는 이유는 TextBlock에 정의된 Text 프로퍼티는 TextProperty라는 의존 프로퍼티에 의해 지원되지만 Run에는 정의 되어 있지 않아서 있다.
    즉, 이 이유는 데이터 바인딩의 타깃은 반드시 의존 프로퍼티가 되어야 하는 것이 이유이다.

    의존 프로퍼티를 적용한 가장큰 이점은 데이터 바인딩이며, 의존 프로퍼티 시스템은 내부에 통보 장치가 구현되어 있다는 것이다. 바인딩 소스가 의존 프로퍼티가 될 필요는 없지만 의존 프로퍼티일 경우에 유리한 상황이 되는 것이다.

    FrameworkElement를 상속 받아서 작성한 clr 객체가 DependencyProperty를 정의 하게 되면서 데이터 바인딩 통지 메시지를 받는 예제를 보여 드리겠습니다.

    참고 ^^
    본 내용은 "찰스페졸드의 WPF"의 내용을 이해 하고 나름 생각과 같이 정리한 겁니다.
    제제가 가해질 경우 바로 삭제하도록 하겠습니다. ^^;
    Posted by gsi
    :

    데이터 바인딩#1 - 기본
    데이터 바인딩#2 - Binding Mode
    ▶데이터바인딩#3 - DataContext
    데이터 바인딩#4 - TextBox vs Run
    데이터 바인딩#5 - FrameWorkElement Demo
    데이터 바인딩#6 - IValueConverter

    바인딩 소스 객체를 다른 방법인 FrameworkElement 에 정의된 DataContext를 사용했다.

        <StackPanel >
            <ScrollBar Name="scroll" Orientation="Horizontal" Margin="24"
                        Minimum="1" Maximum="100"
                        LargeChange="10" SmallChange="1" />
            <Label HorizontalAlignment="Center"
                        DataContext="{Binding ElementName=scroll}"
                        Content="{Binding Path=Value}" />
        </StackPanel>

    기존의 Label에
    Content="{Binding ElementName=scroll, Path=Value}"로 작성했다면,
    위의 코드는 DataContext로 분리 되어 두개로 구성되어 있다.
    하지만 Datacontext로 했다고 해서 특별히 달라지는 건 없다. 그런데 DataContext가 유용할 때가 있다. 즉, DataContext는 엘리먼트 트리를 통해 상속된다는 것이다. 하나의 엘리먼트에 DataContext를 사용해서 바인딩을 설정하고 자식 엘리먼트에 동일하게 적용되게 되기 때문이다.

    아래의 예제를 보자.

        <StackPanel DataContext="{Binding ElementName=scroll}">
            <ScrollBar Name="scroll" Orientation="Horizontal" Margin="24"
                        Minimum="1" Maximum="100"
                        LargeChange="10" SmallChange="1" />
            <Label HorizontalAlignment="Center"
                        Content="{Binding Path=Value, Mode=OneWay}" />
            <Button HorizontalAlignment="Center" Margin="24"
                    FontSize="{Binding Path=Value, Mode=OneWay}">
                Son Byoung Uk
            </Button>
        </StackPanel>

    사용자 삽입 이미지

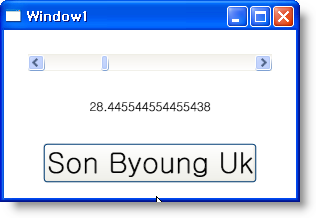
    DataContext는 StackPanel에 한번 설정되고 Label과 Button은 ScrollBar와 바운딩 되었습니다. ScrollBar를 움직이면 Label의 값이 바뀌고 Button의 FontSize와 바인딩 되면서 글자 크기가 바뀌는 것을 볼 수 있습니다.

    참고 ^^
    본 내용은 "찰스페졸드의 WPF"의 내용을 이해 하고 나름 생각과 같이 정리한 겁니다.
    제제가 가해질 경우 바로 삭제하도록 하겠습니다. ^^;
    Posted by gsi
    :

    데이터 바인딩#1 - 기본
    ▶데이터 바인딩#2 - Binding Mode
    데이터바인딩#3 - DataContext
    데이터 바인딩#4 - TextBox vs Run
    데이터 바인딩#5 - FrameWorkElement Demo
    데이터 바인딩#6 - IValueConverter


    Binding 정의가 있는 컨트롤이나 엘리먼트는 항상 바인딩의 타깃이 된다. 바인딩 타깃은 DependencyObject로부터 상속되며 바인딩이 설정되는 프로퍼티는 반드시 의존 프로퍼티의 지원을 받아야 한다.
    그래서 Label인 경우 DenpendencyObject 타입의 정적 publid필드인 ContentProperty가 존재 하게 된다. (내부적으로 ^^)

    바인딩의 코드를 C#에서 처리한 예제를 보면 알 수 있다.

    ScrollBar > scroll
    Label > lbl
    이라고 가정한다.

    Binding bind = new Binding();
    bind.Source = scroll;
    bind.Path = new PropertyPath(ScrollBar.ValueProperty);
    lbl.SetBinding(Label.content, bind);

    여기서 바인딩 타깃은 SetBinding의 메소드를 통해서 호출되게 된다. 이 메소드는 FrameworkElement에서 정의 되었고 DependencyProperty인자를 알수 있습니다.

    이제 바인딩에 사용되는 Mode에 대해서 살펴 보겠습니다.
    바인딩의 Mode를 보게 되면, OneWay, TwoWay, OneTime, OneWayToSource로 나열할 수 있습니다.

    기본적인 형태는 아래와 같습니다.

    Content="{Binding ElementName=scroll, Path=Value, Mode=OneWay}"

    여기서 Mode 프로퍼티를 설정하는 것은 Path 프로퍼티를 설정하는 것과 같이 콤마로 구분됩니다.

    Content="{Binding ElementName=scroll, Path=Value, Mode=TwoWay}"

    이전의 코드에서 보게 되면 OneWay, TwoWay 는 동일하지만 실제로는 Label의 Content 프로퍼티의 변화도 ScrollBar의 Value프로퍼티에 반영됩니다.

    Content="{Binding ElementName=scroll, Path=Value, Mode=OneTime}"

    OneTime 모드의 경우는 타깃이 소스로부터 초기화는 되지만 소스의 변화에 반응하지 않습니다. 즉, 한번만 초기화 되고 더이상 되지 않습니다.

    Content="{Binding ElementName=scroll, Path=Value, Mode=OneWayToSource}"

    이것은 일반적으로 소스와 타깃의 의미에 반대 되는 행동을 하게 됩니다. 다시 말해서 과녁이 화살을 향해서 간 다음에 꽂히는 것과 같습니다.
    이 경우는 타깃은 소스를 갱신하게 되는데요. 이전의 코드에서는 Label은 ScrollBar에 건네줄 숫자 형태의 데이터가 없기 때문에 Label은 비어 있고 ScrollBar를 움직여도 반응이 없게 됩니다.

    하지만 OneWayToSource가 유용할 때가 있습니다. 바로 두 프로퍼티를 바인딩할 때 타깃 프로퍼티가 의존 프로퍼티의 지원을 받지 못하지만 소스는 지원받는 경우라면 소스에 바인딩을 걸고 Mode를 OneWayToSource로 설정하는 것으로 해결할 수 있습니다.
    아래의 소스를 보시면 알 수 있습니다.

        <StackPanel>
            <ScrollBar Orientation="Horizontal" Margin="24"
                    Maximum="100" LargeChange="10" SmallChange="1"
                    Value="{Binding ElementName=lbl, Path=Content}"/>
            <Label Name="lbl" Content="50" HorizontalAlignment="Center" />
        </StackPanel>

    사용자 삽입 이미지

    위의 코드가 되면 Label은 소스가 되고 ScrollBar는 타깃이 되게 됩니다.
    Label은 50으로 Content를 설정하였고, ScrollBar는 가운데 있게 됩니다. ScrollBar를 움직이면 Label도 같이 움직이는 것을 알 수 있습니다. 이 부분은 Mode가 기본적으로 TwoWay로 설정되어 있기 때문입니다.
    하지만 TwoWay를 OneWay 또는 OneTime 로 하게 되면 동작하지 않습니다.

    조금 다르게 아래의 코드를 봅시다.

    Value="{Binding ElementName=lbl, Path=Content, Mode=OneWayToSource}"

    모드는 OneWayToSource로 하게 되면 ScrollBar가 Label 소스를 제어 하게 됩니다. Label은 ScrollBar의 Value을 사용해서 50이 0으로 초기화가 되며ScrollBar를 움직이면 Label이 움직이게 되는 것을 확인할 수 있습니다.

    기본 바인딩 Mode는 바인딩이 정의되어 있는 곳의 프로퍼티에 의해 제어되게 된다. ScrollBar에서  Value 프로퍼티의 기본값이 TwoWay 바인딩 모드로 설정되어 있어야 한다.
    ScrollBar의 의존 프로퍼티인 ValueProperty는 BindsTwoWayByDefault 프로퍼티가 true인 FrameworkPropertyMetadata가 필요하게 되는 것이다. (이것은 속에 있나 봅니다. ^^)

    Mode 프로퍼티는 바인딩의 가장 중요한 컴포넌트 중의 하나입니다. 알맞는 Mode를 설정하는 것이 중요합니다. ^^

    참고 ^^
    본 내용은 "찰스페졸드의 WPF"의 내용을 이해 하고 나름 생각과 같이 정리한 겁니다.
    제제가 가해질 경우 바로 삭제하도록 하겠습니다. ^^;
    Posted by gsi
    :